VS Code Debugging
This appendix explains how to set up and use the VS Code debugger with Kleis.
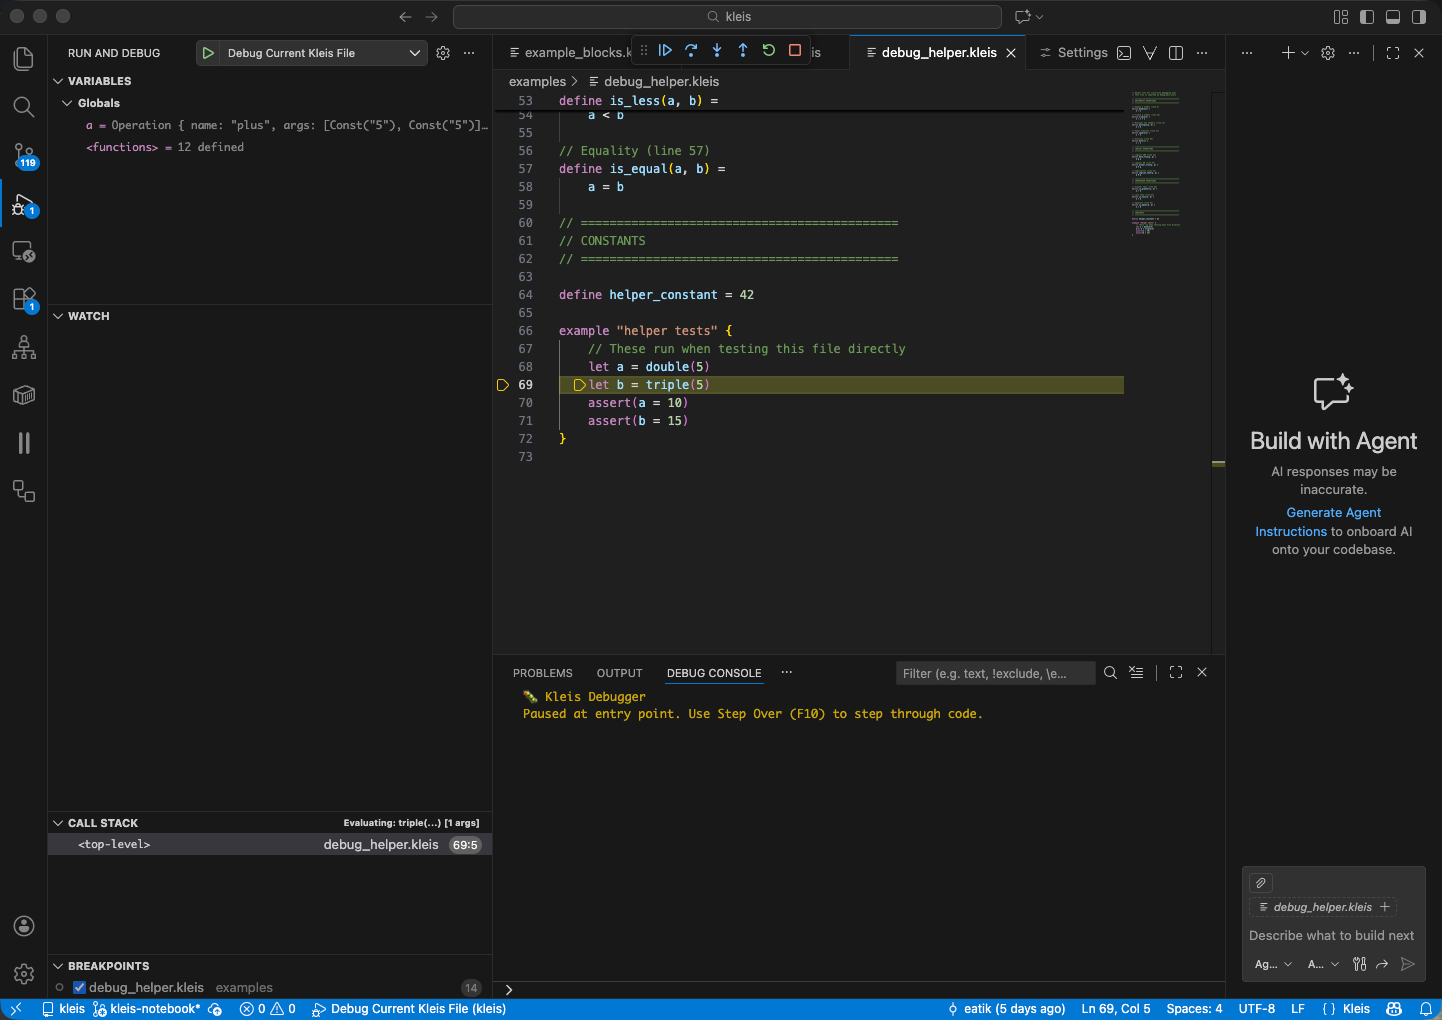
VS Code debugging a Kleis file: breakpoint on line 69, Variables panel showing expression AST, Call Stack showing evaluation context, and Debug Console with status messages.
Prerequisites
- VS Code installed
- Kleis extension installed (provides syntax highlighting + debugging)
- Kleis binaries built:
cargo build --release --bin kleis --bin kleis-lsp
Extension Setup
The Kleis VS Code extension is located in vscode-kleis/. Install it:
cd vscode-kleis
npm install
npm run compile
code --install-extension kleis-*.vsix
Or for development, open the extension folder in VS Code and press F5 to launch an Extension Development Host.
Workspace Settings
Create .vscode/settings.json in your project to configure the extension:
{
  "kleis.serverPath": "${workspaceFolder}/target/release/kleis",
  "kleis.replPath": "${workspaceFolder}/target/release/repl",
  "kleis.trace.server": "off"
}
Settings Reference
| Setting | Description |
|---|---|
kleis.serverPath | Path to the kleis binary (used for LSP and DAP) |
kleis.replPath | Path to the repl binary (used for REPL panel) |
kleis.trace.server | Logging level: "off", "messages", or "verbose" |
Note: Use absolute paths for reliability. Example for a typical setup:
{
  "kleis.serverPath": "/Users/yourname/git/kleis/target/release/kleis",
  "kleis.replPath": "/Users/yourname/git/kleis/target/release/repl",
  "kleis.trace.server": "off"
}
Set "kleis.trace.server": "verbose" when debugging extension issues.
Launch Configuration
Create .vscode/launch.json in your project:
{
    "version": "0.2.0",
    "configurations": [
        {
            "type": "kleis",
            "request": "launch",
            "name": "Debug Kleis File",
            "program": "${file}",
            "stopOnEntry": false
        }
    ]
}
Configuration Options
| Option | Type | Description |
|---|---|---|
program | string | Path to .kleis file to debug |
stopOnEntry | boolean | Stop at first line (default: false) |
Setting Breakpoints
Click in the gutter (left margin) next to any line in an example block:
example "my test" {
    let x = 5          // ← Click here to set breakpoint
    let y = double(x)  // ← Or here
    assert(y = 10)
}
Where Breakpoints Work
| Location | Works? | Notes |
|---|---|---|
| Inside example blocks | ✅ Yes | let, assert, expressions |
| Function body lines | ✅ Yes | Stops when function is called |
| Top-level definitions | ❌ No | Declarations, not executable |
| Imported files | ✅ Yes | Set breakpoints in helper files |
Breakpoints in Imported Files
You can set breakpoints in imported files:
// helpers.kleis
define double(n) =
    n + n    // ← Breakpoint here catches all calls to double()

// main.kleis
import "helpers.kleis"

example "cross-file breakpoint" {
    let x = double(5)  // Stops at the breakpoint in helpers.kleis
}
Tip: Open the imported file and set breakpoints before starting the debug session.
Starting a Debug Session
- Open a
.kleisfile with example blocks - Set breakpoints on lines you want to inspect
- Press F5 or click Run → Start Debugging
- Select “Debug Kleis File” configuration
Debug Controls
| Key | Action | Description |
|---|---|---|
| F5 | Continue | Run until next breakpoint |
| F10 | Step Over | Execute current line, don’t enter functions |
| F11 | Step Into | Enter function calls |
| Shift+F11 | Step Out | Finish current function, return to caller |
| Shift+F5 | Stop | End debug session |
Inspecting Variables
The Variables panel (left sidebar) shows:
- Local variables — Let bindings in current scope
- Function parameters — Arguments passed to current function
- Inferred types — When available, types are displayed
Important: Variables are displayed as AST expressions, not just values:
example "inspection demo" {
    let x = 5
    let y = x + 1
    // Variables panel shows:
    //   x = Const("5")
    //   y = Operation { name: "plus", args: [Const("5"), Const("1")] }
}
Type-Aware Variable Display
When type information is available, variables show their inferred types:
example "typed variables" {
    let M = matrix2x3([[1,2,3],[4,5,6]])
    let v = vector3([1, 2, 3])
    let c = complex(1, 2)

    // Variables panel shows:
    //   M : Matrix(2,3,ℝ) = [[1,2,3],[4,5,6]]
    //   v : Vector(3,ℝ) = [1, 2, 3]
    //   c : ℂ = 1+2i
}
This is intentional! Kleis is a symbolic mathematics system. Variables hold expressions that represent mathematical objects, not just computed values. This enables:
- Symbolic manipulation — See the structure of expressions
- Z3 verification — Pass expressions to the theorem prover
- Provenance tracking — Understand where values came from
- Type checking — Verify types match expectations
Call Stack
The Call Stack panel shows the execution path:
fibonacci (n=5)          ← Currently here
fibonacci (n=6)
example "fib test"       ← Entry point
Click any frame to see its local variables and source location.
Cross-File Debugging
When stepping into imported functions, VS Code opens the source file:
// main.kleis
import "helpers.kleis"

example "cross-file" {
    let result = helper_function(5)  // ← Step Into (F11)
    // VS Code opens helpers.kleis at helper_function definition
}
How It Works
Every expression carries its source location (line, column, file path). When the evaluator processes an expression from an imported file, the debugger reports that file’s location to VS Code, which opens it automatically.
Debug Console
The Debug Console (bottom panel) shows:
- Evaluation progress
- Assertion results (pass/fail)
- Error messages
You can also evaluate expressions in the console during a paused debug session.
Assert with Z3 Verification
New in v0.93: Assertions in example blocks use Z3 for symbolic verification!
How It Works
When you write assert(expr):
- Concrete values — Checked via structural equality
- Symbolic expressions — Verified using Z3 theorem prover
structure CommutativeRing(R) {
    operation (+) : R × R → R
    axiom commutativity: ∀(a b : R). a + b = b + a
}

example "symbolic verification" {
    // ✅ Z3 verifies using commutativity axiom!
    assert(x + y = y + x)

    // ❌ Z3 disproves with counterexample
    // assert(x + y = y + y)  // "Counterexample: y!1 -> 1, x!0 -> 0"

    // ✅ Concrete: structural equality
    let a = 5
    assert(a = 5)
}
Assertion Results
| Result | Badge | Meaning |
|---|---|---|
Passed | ✓ | Concrete values match structurally |
Verified | ✓ | Z3 proved the symbolic claim |
Failed { expected, actual } | ✗ | Concrete values differ |
Disproved { counterexample } | ✗ | Z3 found a counterexample |
Unknown | ✗ | Could not verify (treated as failure) |
Note: The debugger displays verification badges (✓/✗) next to assertion variables in the Variables panel, so you can see at a glance which assertions passed or failed.
Requirements
- Structure axioms must be defined for the operations used
- Z3 must be able to load the relevant axioms
- Works best with algebraic properties (commutativity, associativity, etc.)
Numerical Computations
For concrete numerical computations, build with the numerical feature:
cargo build --release --features numerical
This enables LAPACK-backed operations:
example "numerical" {
    let A = Matrix(2, 2, [4, 1, 1, 4])

    // Compute eigenvalues (requires numerical feature)
    let eigs = eigenvalues(A)
    // eigs = [5, 3]

    // Matrix multiplication
    let B = Matrix(2, 2, [1, 0, 0, 2])
    let C = matmul(A, B)

    // SVD decomposition
    let usv = svd(A)  // Returns [U, S, V]
}
Available Numerical Operations
| Operation | Description |
|---|---|
eigenvalues(M) | Compute eigenvalues |
eig(M) | Eigenvalues and eigenvectors |
svd(M) | Singular value decomposition |
solve(A, b) | Solve linear system Ax = b |
inv(M) | Matrix inverse |
det(M) | Determinant |
cholesky(M) | Cholesky decomposition |
qr(M) | QR factorization |
matmul(A, B) | Matrix multiplication |
Note: Numerical operations require concrete values. Symbolic matrices remain symbolic.
Troubleshooting
Breakpoints Not Hitting
Problem: Breakpoint shows as gray (unverified) or never hits.
Solutions:
- Ensure breakpoint is on a line inside an example block
- Ensure the example block is actually executed
- Rebuild the Kleis binaries:
cargo build --release
“File not found” Errors
Problem: Debugger can’t find imported files.
Solutions:
- Use relative paths in imports:
import "stdlib/complex.kleis" - Run debug session from the project root directory
- Check that the imported file exists at the specified path
Slow Stepping
Problem: Each step takes several seconds.
Solutions:
- Use release builds:
cargo build --release - Avoid stepping through deeply recursive functions
- Use “Step Over” (F10) instead of “Step Into” (F11) for library functions
Debug Session Won’t Start
Problem: F5 does nothing or shows an error.
Solutions:
- Check
.vscode/launch.jsonexists and is valid JSON - Ensure Kleis extension is installed and enabled
- Check the Output panel (View → Output → Kleis) for error messages
- Verify binaries exist:
ls target/release/kleis*
Architecture
The debugging system uses the Debug Adapter Protocol (DAP):
┌─────────────┐      DAP         ┌──────────────┐
│   VS Code   │ ←───────────────→ │ kleis server │
│   (client)  │    JSON-RPC      │   (adapter)  │
└─────────────┘                   └──────────────┘
                                        │
                                        ▼
                                  ┌──────────────┐
                                  │  Evaluator   │
                                  │  + DebugHook │
                                  └──────────────┘
- VS Code sends DAP commands (setBreakpoints, next, stepIn, etc.)
- Kleis server translates to evaluator debug hook calls
- Evaluator pauses at breakpoints, reports current expression’s span
- Server sends stopped events with location (line, column, file)
- VS Code highlights the current line
Source Span Tracking
The key to accurate debugging is SourceSpan:
#![allow(unused)]
fn main() {
pub struct SourceSpan {
    pub line: u32,
    pub column: u32,
    pub end_line: u32,
    pub end_column: u32,
    pub file: Option<Arc<PathBuf>>,  // File path (Arc for cheap cloning)
}
}
Every Expression node has an optional span. The parser attaches the span during parsing. When evaluating, the span travels with the expression, so the debugger always knows the source location.
Understanding Symbolic Debugging
Kleis debugging differs from traditional debuggers because Kleis is a symbolic mathematics system, not an imperative programming language.
What “Execution” Means in Kleis
In Kleis, “execution” means symbolic evaluation:
- Substitution — Replace function calls with their definitions
- Pattern matching — Dispatch based on structure
- Simplification — Apply algebraic rules
There’s no “program counter” moving through instructions. Instead, expressions transform into simpler expressions.
Variables Hold Expressions, Not Values
let y = sin(x) + cos(x)
// y doesn't hold a number
// y holds: Operation { name: "plus", args: [sin(x), cos(x)] }
This is intentional! It enables:
- Passing expressions to Z3 for verification
- Symbolic differentiation, integration
- Algebraic manipulation
When to Use the Debugger
| Use Case | Debugger Helps? |
|---|---|
| Understanding expression evaluation | ✅ Excellent |
| Verifying axiom applications | ✅ See Z3 results |
| Finding structural issues | ✅ See AST in Variables |
| Computing numeric values | 🔶 Need numerical feature |
| Traditional imperative debugging | ❌ Wrong mental model |
Tips for Effective Debugging
- Start with simple examples — Debug small example blocks first
- Use Step Over for library code — Don’t step into stdlib functions unless needed
- Watch the Variables panel — See how expressions transform as you step
- Set multiple breakpoints — Mark key points in your logic
- Use the Call Stack — Understand the substitution chain
- Think symbolically — Variables hold AST, not computed values
- Use Z3 for verification — Let
assert()prove symbolic claims
See Also
- Example Blocks — How to write debuggable code
- The REPL — Interactive exploration
- Grammar Reference — Full language syntax